AudioAccess PX-612 psu

Thread Starter

lipjam

Joined Jan 7, 2017
21
https://drive.google.com/file/d/0B-uy-gPp1BqRQlNjNWFWVEpyNFNfbmVjb2JCbVdRSGdaQTNz/view?usp=sharingI will start by saying my knowledge of electronics is basic. I work with computers and know enough to do basic solder jobs and cap replacments etc.
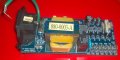
I am an audio enthusiast and like my power amps and have picked up this amp that had no power. I opened it to find the on the main PSu board the transformer had come away from it's connector pins. When I say come away I mean the pins had come away from the the coil unit not from the pcb board. The piece I am talking about is labelled 080-0003-A in the attached photo. Everything else looks in tact in the amp. No blown fuses or swollen caps and very clean throughout.

My question is a simple one can somone identify the part labelled 080-0003-A in attached photo so I can buy a replacment. I suspect it is damaged but it is just a guess. There is no signs or traumatic damage from a drop or fall on the unit so I suspect the manufacturer just didn't use enough glue to hold it in place or else it deteriorated and the unit came lose and seperated due to its weight but I am open to other possible suggestions?

The unit is on four pins that are soldered to the pcb board.
https://drive.google.com/file/d/0B-uy-gPp1BqRWVFPbEhjcFpLQ0N1UVhRbk15RlJuSGRra3FF/view?usp=sharing
https://drive.google.com/file/d/0B-uy-gPp1BqRQlNjNWFWVEpyNFNfbmVjb2JCbVdRSGdaQTNz/view?usp=sharing

WP_20170107_20_44_00_Pro.jpg

WP_20170107_22_47_16_Pro.jpg

WP_20170107_21_12_35_Pro 2.jpg
 
Last edited:

#12

Joined Nov 30, 2010
18,224
I have asked the Moderators to reveal the missing photos. Please be patient.

Yikes! There no Moderators logged in right now.:(
 
Last edited:

#12

Joined Nov 30, 2010
18,224
The parts list only shows one transformer, so is it that big, honking, toroid?
I can't see a problem in the one photo that is revealed, so far.
 

#12

Joined Nov 30, 2010
18,224
I see it. Somewhere around 20 watts, yellow.
Is it kaput, or maybe hot glue might work?

That one isn't about audio. It's just a power transformer to make some DC voltages.
 

Thread Starter

lipjam

Joined Jan 7, 2017
21
I see it. Somewhere around 20 watts, yellow.
Is it kaput, or maybe hot glue might work?

That one isn't about audio. It's just a power transformer to make some DC voltages.
The amp produces no power at all. The power LED does not light up when I plug it in and flick the main power switch on.
I suspect it is this transformer or the main switch but as I am no expert do not want to chance getting the wrong part so wanted some advice on the correct specified piece to replace them with.

There are two fuses on the psu board and neither are blown I have resecured the transformer to the board and plugged it back in but still no power. The two fuses on the board remain intact so it is not shorting either. Just seems to be a break in the circuit early on. So either the switch is faulty or the small transformer on the board attached.
 
Last edited:

#12

Joined Nov 30, 2010
18,224
It has four pins which attach to the PCB but there are four other solder points and I am unsure of their significance please see reverse side of the PCB attached (the black plastic is the side of a main power switch which may also be faulty?):
The extra solder holes are for a different transformer which MIGHT be used on this board. I think I see a bad solder joint on the right, upper pin of your photo in post #10.

Transformers are hard to kill. I have seen no mechanical damage in your photos. I assume the damage is between the plastic coil holder and the top of the circuit board. I can't "name that transformer" so you can buy a new one. I would surely ask for some voltage measurements to see if the transformer is actually bad. That shouldn't bee too hard if you can plug it in and check the pins for AC voltages.
 

Thread Starter

lipjam

Joined Jan 7, 2017
21
I would concur with your analysis. I cannot see where the pins connect to the coil as there is a plastic cover which I cannot remove without damaging them and I thought it easier to replace the complete unit as there are just four pins connecting it to the PCB board.

The two pins on the reverse (reverse side view without the fuse photo) were the ones that became seperated from ther transformer and I simply pushed them back on and heated the solder joints so maybe they are not making contact but as the plastic cover is impeding my view I cannot be certain.

The copper coil contacts on the fuse side to the pins soldered to the board. I am unsure what connects to the reverse side as I cannot see behind the plastic cover but I am certain that the copper coil does not.

Sould I heat it back up and try to push the pins that were separated as far as they go and see if contact can be made inside the plastic cover on the coil. Or do you have any other suggestions?
 
Last edited:

#12

Joined Nov 30, 2010
18,224
any other suggestions?
First, check the ohms of each coil. Should below 1000 ohms each. Probably in the hundreds at the most. Maybe less than 100 ohms.
Second, plug it in and see if power line voltage is on two pins and a much lower voltage is on the other two pins. Probably around 20 VAC. If fail, start digging with a pocket knife. What do you have to lose if it's already broken? If win, some hot glue would be my choice.

I think a soldering iron might melt some of the plastic back from the pins.
Do I see little tails hanging out? They belong soldered to the nearest pin.
 

Thread Starter

lipjam

Joined Jan 7, 2017
21
Thanks there is a small tail which may need soldering back to the pins I think this may be part of the problem. I need to find some solder and buy a decent multimeter. I do no do this often enough to justfiy having one but I will purchase one for this project and let you know how I get on. Once again thanks for the advice I do appreciate you taking the time to help.
 

Thread Starter

lipjam

Joined Jan 7, 2017
21
I have two questions:
1. Regarding the tails can you tell me what is their purpose?
2. Can you recommend a multimeter a list of reputable manufacturers. There are so many available on eBay.
 

#12

Joined Nov 30, 2010
18,224
The tail is the end of the transformer winding. It should be connected to the solder pin. If it isn't, connect it.
Harbor Freight for a $5 DMM
Except on coupon days when they are free.
 

Thread Starter

lipjam

Joined Jan 7, 2017
21
WP_20170109_23_10_18_Pro 1.jpg WP_20170109_23_10_28_Pro 1.jpg I have taken off the transformer from the PCB and removed the plastic cover to inspect more closely (see attached photo). I notice the two tails from the fine wire winding have broken off from the pins hence the break in the circuit. The problem I have is the copper tail is too short to reattach to the pins. I do not want to interfere with the winding. So can I solder an extra length of wire of similar thickness to the tail in order to reattach to the pins.

Will this impact the performance of the transformer in any way?
 
Top