Piezo drum flasher

Thread Starter

Interitus

Joined Nov 8, 2009
34
Sorry to bump such an old thread, but this guy is doing exactly what I'm trying to do. Which is to light up the drum pad when I strike it, with LEDs inside the pad.

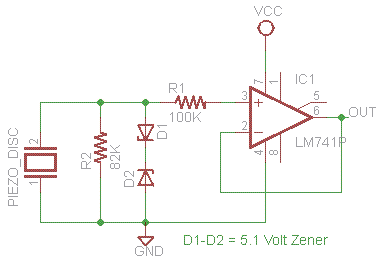
So I hooked up the last circuit as close as I could. The store I was at didnt have the 2n7000, he said the VN10KLS would be a close equivalent. I also don't have a potentiometer to use, so instead I used a few resistor in series. Here's a pic of my breadboard.


If I have the flat side of the mosfet to the bottom of the image (facing the inputs), the LEDs stay on all the time. The way it is facing now works, but each time I tap the piezo, the LEDs go dimmer each time until they stay dark. If I wait a few minutes, I can tap the piezo again and have it work. I've tried playing with the resistors a bit, and tried a smaller capacitor, but with no noticeable effect. I'm not very knowledgeable about electronics, so I have no idea what to change.
 
Last edited:

SgtWookie

Joined Jul 17, 2007
22,230
It looks like you now have the MOSFET connected correctly.

Does the MOSFET get warm as the LEDs get dimmer?

If so, you may need to decrease the resistance for the R1/R2 combination. That will tend to turn the MOSFET off more quickly.

I never received any feedback from the initial poster from that old thread, so I don't know if it worked for them or not.
 

SgtWookie

Joined Jul 17, 2007
22,230
I see now what's happening.

The piezo accumulates a charge across itself (- on top) for which there is no discharge path, except by "leaking" across diode D1.

Adding a diode across the piezo should fix that problem, like this:


Note that the Zener is now D3; D2 was added across the piezo.
The Zener can be a 12v; Radio Shack stocks them. The point of the Zener is to prevent the gate voltage from going higher than 15v in respect to the source terminal.

Give it a try, and let us know if it works.
 

Attachments

Thread Starter

Interitus

Joined Nov 8, 2009
34
Awesome! It works! I didnt have another actual 4148, but I used a switching diode out of my 500in1 kit, and seems to work just as well.


So now that I've got it working, I could power more than just 3 LEDs right? I'm looking at about 5 LEDs per circuit minimum... But I'm not even sure that'll be bright enough for my purpose, tho I'll have to actually try it out to be sure. Would I be able to switch the LEDs out to something like a 12 or 24volt cold cathode tube, or an EL tape? (providing I can even find the stuff anymore...)
 

SgtWookie

Joined Jul 17, 2007
22,230
Awesome! It works!
Cool deal! :cool:

I didnt have another actual 4148, but I used a switching diode out of my 500in1 kit, and seems to work just as well.
That's perfectly fine - practically any diode would work.

So now that I've got it working, I could power more than just 3 LEDs right? I'm looking at about 5 LEDs per circuit minimum... But I'm not even sure that'll be bright enough for my purpose, tho I'll have to actually try it out to be sure. Would I be able to switch the LEDs out to something like a 12 or 24volt cold cathode tube, or an EL tape? (providing I can even find the stuff anymore...)
Well, this circuit was basically a "quick and dirty" type of thing. You might be able to add some more LEDs to it, but the current sinking ability of the MOSFET is limited, and the discharge path for the gate is rather slow - that will lead to heating if trying to drive much of a load.

It would be better to use a comparator to sense the voltage level, and use the output to trigger a larger MOSFET or transistor.
 

Thread Starter

Interitus

Joined Nov 8, 2009
34
Hmm, well I did a bit of quick research on the EL tape and such, and I dont think I'll be able to get any very cheaply or easily. So I'd be driving 5 to 7 LEDs, which seems to be within the ranges of the mosfet as far as I can tell. It's not going to be in an enclosed space, so it'll have plenty of ventilation for cooling. If you think I should use a comparator anyways, you'll have to draw me a circuit, cause I barely know whats going on in this one! :) I'd like to keep it this simple tho, I still have to actually solder this all into a permanent board, and my soldering skill are very very rudimentary... wait no thats not the right word, terrible. yeah thats the one I should use.
 

SgtWookie

Joined Jul 17, 2007
22,230
LOL!

To be completely honest, when I first tried soldering wires together, I made very nasty-looking joints with huge gray and wrinkled clumps of solder everywhere. I cringe when I think back at how truly awful they were.

I didn't know to use isopropyl alcohol to clean the parts before soldering, I didn't know how to clean and tin the soldering iron, I wasn't using rosin flux, and I didn't keep the joints immobile until the solder cooled. Amongst other sins. :rolleyes:

Back to the schematic - I've shown the LEDs wired in parallel, each with their own current limiting resistor. You could instead wire LEDs in series, and use a single current limiting resistor.

LEDs come with a "forward voltage" rating (Vf) at a certain current. Use the "typical Vf @ current" rating.
For example, a red LED might have a "typical Vf 2.2v @ 20mA" specification. From that, you can figure out how many LEDs you can run in series from your power supply.

Subtract 1v from your supply voltage (you should have at least 1v for the current limiting resistor), then divide the remainder by the Vf of the LED. Then take the integer portion; that's how many LEDs you can operate in series.

Let's say you had a 12v supply, and were using green LEDs; typical Vf 3v @ 20mA.
MaxLEDs = INT((12V - 1V)/3v)
MaxLEDs = INT(11/3)
MaxLEDs = INT(3.667)
MaxLEDs = 3
So, you could run 3 in series.
Then you calculate what value limiting resistor you'll need.
Rlimit >= (Vsupply - (Total Vf)) / Desired Current
Rlimit >= (12v - (3 x 3v)) / 20mA
Rlimit >= (12v - 9v) / 0.02A
Rlimit >= 3/0.02
Rlimit >= 150 Ohms

Next, we look at a table of standard resistance values. One is available here:
http://www.logwell.com/tech/components/resistor_values.html

E12 series resistors (yellow columns) and E24 series (green columns) are commonly available.
We can see that 150 Ohms is a standard value of resistance. If it were not, you would need to use the next larger value of resistance. If you had to use a larger value, you can determine what the current will be by dividing the voltage (3v) by the resistance in Ohms.

Next, you need to determine the power requirement.
3v will be dropped across Rlimit, and the current will be 20mA.
Power in Watts = Voltage x Current
P = EI
P = 3v x 20mA
P = 3 x 0.02
P = 0.06 Watts
For reliability, we double the wattage requirement to 0.12 Watts
You could use a resistor rated for 1/8 Watt (0.125) or higher.
 

Thread Starter

Interitus

Joined Nov 8, 2009
34
if I have the LEDs in parallel tho, I can use a 5V supply, and it'll be 5volts on each branch of the circuit, then each branch will draw its own current, so my limit would instead be the limit of my transformer, which in my case is 500mA.

As for the rest, most of your reply went over my head, I did homework today and my brain needs a break. All my resistors are 1/4 watt or better tho. My red LEDs are 5v at 20ma as far as I know, no paperwork with them. I'll be using different colored LEDs for the other drum pads tho, so I'm guessing I'll have different values for them? Altogether I'll be using atleast 5 reds, 5 yellows, 5 greens, 5 blues and 5 oranges. Only 3 colors at the same time tho.
 

SgtWookie

Joined Jul 17, 2007
22,230
if I have the LEDs in parallel tho, I can use a 5V supply, and it'll be 5volts on each branch of the circuit, then each branch will draw its own current, so my limit would instead be the limit of my transformer, which in my case is 500mA.
No, it's the limit of the MOSFET, which for practical reasons is about 100mA, or five LED strings. Even that is a bit much with the slow gate fall time.

As for the rest, most of your reply went over my head, I did homework today and my brain needs a break. All my resistors are 1/4 watt or better tho. My red LEDs are 5v at 20ma as far as I know, no paperwork with them.
I'll bet they're a lot lower than Vf=5v; more like 2.1v to 3v maximum.
I'll be using different colored LEDs for the other drum pads tho, so I'm guessing I'll have different values for them?
That's right. Just use the formula from my last post.
Altogether I'll be using atleast 5 reds, 5 yellows, 5 greens, 5 blues and 5 oranges. Only 3 colors at the same time tho.
Follow the specs supplied with them, and plug their numbers into the formulas I posted.
 

Thread Starter

Interitus

Joined Nov 8, 2009
34
Ok, so I soldered up the main board, and the 5 LED string using the white LEDs I got... Plug in and it works GREAT... looks freaking cool (tho I forgot to put the binder tabs to color them)
But theres a problem once I hook it up to the rb2 drum controller. The pad has a 1/4" mono jack in the side of it, which I use a cable to hook up to the controller. I hooked up the circuit inputs in parallel with the mono jack connections to pick up the piezo. I think there's some sort of feedback coming from the controller, and it interferes with the lights and the game. For one, if I hit the pad fairly hard once, or hard in a roll, the lights stay on about 3x as long as they should. Second, the game will miss hits and the effects of hitting hard or soft are mostly reversed. Generally it seems that if I play softly, it'll be a harder hit than it should in-game, hitting moderatly gets only a soft hit in-game, and hitting hard gets no hit. In-game responsiveness seems to vary a little.
Would there be a way to keep the single pad piezo in parallel with both the game controller and LED circuit, but isolate them from each other? Or will I need to get another piezo in there somehow?
 

SgtWookie

Joined Jul 17, 2007
22,230
OK, I have NO clue how you've connected it to your controller or game, and I have no idea what the inputs to your controller or game look like electrically!
 

Thread Starter

Interitus

Joined Nov 8, 2009
34
The Drum controller is just a wireless unit, not too far off from the regular xbox controllers, but with added wires out to each pad. Each pad has a seperate pair of wires, and connect to the piezo on the pads with a small 2 position wire connector. They are wrapped around a small iron core just before going into the controller itself. I've connected by disconnecting the pads, and connecting my own wires in its place. Inside the controller itself, I have no idea whats in there. I could take apart the RB1 controller, but I doubt I'd be able to trace out its circuit.

Is it not possible to double the input of the piezo to two outputs, keeping them electrically isolated? With a repeater or somesuch? Or would such a thing require the schematics of the controller?
 

BMorse

Joined Sep 26, 2009
2,675
If you are just tapping off of the drums piezo output as it goes into its own controller, you will cause a conflict in the controllers analog inputs from the controller, you will be better off isolating your circuit with an optocoupler.....

My .02
 

Thread Starter

Interitus

Joined Nov 8, 2009
34
I spent a while in IRC #electronics talking to some guys about using the optocoupler, and they are doubting it'll work. I'm also not thinking it will work either.

I drew up my circuit, and underneath added a very rough idea of how I would hook up the optocoupler. Where I have "LEDs/Power" is the section in which I have all the LEDs and the power hook ups as drawn above it. Q1 would be hooked up identical to the first drawing as well.


Beyond this I have no idea what I'm doing. I picked up two optocouplers today, an NTE3040 and an NTE3045 to try out, but I'm doubting either one will do the job...
The main goal is to not interrupt the voltage/current from the piezo to the game controller. A slight drop in voltage I think would be fine as it will still trigger the game. The LEDs are less important and can have a little delay and voltage drop. As long as they go on.
 

Attachments

Thread Starter

Interitus

Joined Nov 8, 2009
34
Well we worked on it a little longer, and ended up with this:

which we decided wouldnt work. So I think I'm at the point where I'm just going to try shoving another piezo into the pad somehow. Dont know exactly, but what the hey...
 

Attachments

Top